Category Archives: Crafts and Gifts

The Rainbow Loom Craze

Well, Santa and grandparents both brought my girls various kinds of looms for Christmas. I was amazed at how inept I am at following basic instructions, but once we got it, my girls haven’t stopped.

My tips are to watch YouTube tutorials and my mom had the brilliant but simple hack of sorting colors in muffin tins.

20140103-142055.jpg

Leave a comment

Filed under Children, Crafts and Gifts, talents, Uncategorized

Big black frame for class party photo booth

Frame, random props and a camera and you are ready to go! The kids have a blast.

20140103-141215.jpg

20140103-141349.jpg

20140103-141418.jpg

20140103-141503.jpg

1 Comment

Filed under Children, Crafts and Gifts, DIY, Motherhood, Party Planning, Uncategorized

DIY Weeping Angel Wings

ImageImage

I looked everywhere for cheap wings to spray paint gray.  The cheapest I could find that weren’t fairy wings were $50.

I have four kids that need wings.  There’s no way in heck I’m paying $200 for one part of a Halloween costume!

Sooooooo–I sat and stared at my Costco Milk box and took out my roll of Duct Tape:

Image

I drew an outline of a wing, free-handed.  Then cut it out.

I chose the handle of the box to be where it was originally so I could fashion straps easier.

I ended up taping over them anyway though.Image

I toyed for a while between having a solid piece with the handle holes for straps, or

what I actually did, which was to keep the natural bend in the box so the wings moved and

would work better through doors and such.

Image

Then I began with the Duct Tape.  I started with the middle.

After stabilizing the two pieces together, I began with the actual wings,

choosing which side looked the best facing out.  I really

wanted to support the middle to avoid ripping with the kids’ wear and tear.

Image

After doing one long strip up and over the wing and down again, I lined up the strips and

carefully pressed them together, using my hands to get a nice groove around the curve of a “feather”.
ImageImage Then I cut just outside of the groove.

Image

It continued on like this until the wings were covered.

Then I begs making small-ish strips with the ends folded over for feathers.

Image

Place folded end downward where you want a feather and carefully cut out the

shape of a feather.  Repeat until it looks right to you.

ImageImage

Image

Voila!  Now for the straps.

I made two strips of tape folded over itself.

Make sure it can go over their shoulders.

Adhere to the inside of the wings and stabilize the straps.

Image


Leave a comment

Filed under Budget, Children, Crafts and Gifts, DIY, Family, Halloween, Holidays, Motherhood, talents

One very cheap and easy Halloween decorating idea

Image

One thing I like to do every holiday is paint the windows.  It razor blades right off and is a very frugal way of being festive.  I use tempera paint and free hand it, but you could use a stencil as well.  It takes little to no time at all and adds some flair.

IMG_0062


Leave a comment

Filed under Crafts and Gifts, Halloween, Holidays, talents

DIY Big Black Frame for photo booth and decor

With an upcoming Halloween/Birthday party, I wanted a huge frame for a photo booth.  Turns out, it is a cute overall decor item too!

Simple black frame from press board

Simple black frame from press board

It started when the fall clean up for our city was taking the large garbage items.  I looked a the huge piece of press board we had in the garage and wanted it re-purposed or thrown out.  With the upcoming party, I thought I’d repurpose it for a photo booth.

Step one: Find a work station.  I had nothing that large, so I used to long tables.

Step two:  Measure out and trace your frame.

Measure and trace the guide for cutting

Measure and trace the guide for cutting

Step three: Use a drill to make starting your cut and making corners easier.

Step four: Use your favorite saw for the job.  I love my jigsaw.

The hole you drilled helps you start cutting lowering your chance of a snapped blade.

The hole you drilled helps you start cutting lowering your chance of a snapped blade.

Step five: Admire your handiwork.  Take a break and grab your choice of covering.

The cut out frame

Step six: Cover the baby up.  I was going for a Halloween look, so I used a Dollar Store black plastic table cloth and packing tape, as I misplaced the duct tape I wanted.  Your size and shape makes a difference in how you wrap.  Mine was really large and I made it six inches thick the entire way around the frame.  So I cut the table cloth into strips and taped it.

Duct tape would have been better, but the packing tape held.

Duct tape would have been better, but the packing tape held.

Step seven: Admire your handiwork again.  It’s not too shabby and it didn’t take long.

Wrapped frame

Step eight: Add embellishments like cobwebs and other decor.

Finished Product.

Finished Product.


For the party, I’ll move it out and prop it up, but for now, I rather like it by the door.


3 Comments

Filed under Budget, Crafts and Gifts, DIY, Party Planning

Apple Cider

With the recent rain storms came the all to familiar autumn chill that accompanies this time of year in the Rocky Mountains. It is a time of year I love and dread all at the same time. The beauty of the changing foliage, the delicious recipes that accompany apple picking season, and of course the lovely sweaters! However, though some may celebrate and dance to the end of summers long hot days…I dread the cold short dark days of winter. I can appreciate a beautiful snow crested hill or a crisp sleigh ride under warm blankets, or watching the snow fall out my living room window while I cuddle up next to the fire with a good book…but the days between when I leave for work in the wet, cold, dark and come home in the same act as a reminder that winter simply isn’t my best time of year. There are however the two lovely seasons that flank winter and are filled with an endless array of activities and food that I love to get caught up in. So here’s to Autumn! It’s true it is the herald of winter…which is why I intend to enjoy it while it lasts!

Home Made Apple Cider – I made up this recipe after looking up multiple recipes online, and not finding myself particularly satisfied with any. It turned out really well. I hope you enjoy it!

image

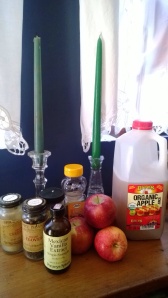
What you will need. Apples, water and/or apple juice (we had apple juice I wanted to use), vanilla, honey, cinnamon, cloves, nutmeg, cardamom, a stock pot, potato masher, knife, strainer/cheese cloth, and a cup to enjoy!

image

Start by adding your apple juice and equal parts water to your stock pot and set heat to medium. (If you have enough apples you can use just water because the quantity of apples will provide enough flavor and acid. However, if you have apple juice in the fridge you want to use…or you only have a few apples I recommend throwing in the apple juice and adding equal parts water.)

image

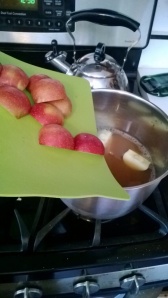
While the apple juice is coming up to temp chop and core your apples. Then add them to the pot skins and all.

image image

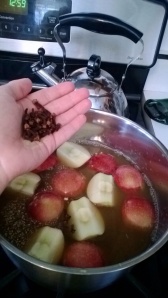
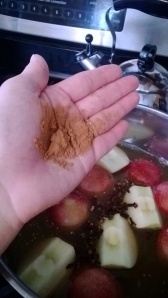
Next add your spices cinnamon, cardamom, nutmeg, and whole cloves to the pot. (You may have noticed I didn’t include measuring spoons into the list of things you will need at the top. Even if you are new to cooking do not fret – get comfortable with your own tastes and preferences and then go the old fashion route and add a palm full of spices and herbs here and there to suit your tastes)

image image image

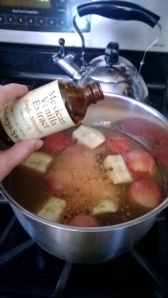
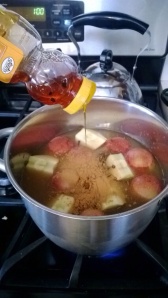
Next add a few drops of vanilla, a good squeeze of honey and finally a pinch of salt. These three ingredients add the sweet note in the background to compliment the spices. (Don’t forget your salt! It may seem odd but sweeteners simply won’t pop the same way without it.)

image

Stir to combine all ingredients and let simmer over low for a few hours until the house is fragrant with autumn spices and the apples are tender.

image

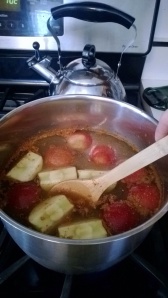
Once the apples are nice and tender go to town with your potato masher (or other smashing tool). Break up all those apples to release the flavors, juices and color. Then allow to simmer further (you can simmer for 30min or a few hours at this point. It is to your discretion. Just sip and taste as it simmers until it has the flavor you are looking for. Add any additional sweeteners or spices as needed.

image

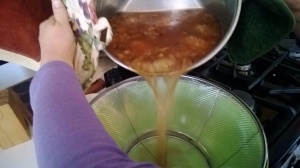
Once the cider is to your level of sweet and spicy remove from heat and pour through a thin mesh strainer or through a cheesecloth.

image image

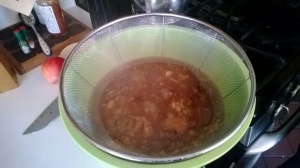
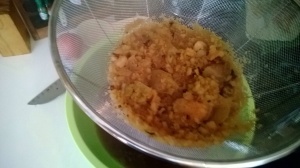
If using a strainer lift strainer and allow excess juice to come out before removing apple skins, pulp and clove seeds. If you are using a cheese cloth gather the cheese cloth together, lift over bowl and squeeze out remaining juice. With a strainer you may need to strain the cider more than once.

image

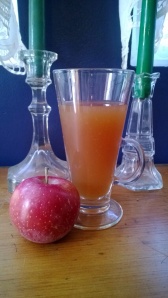
Finally pour yourself a nice hot cup of delicious spicy cider and enjoy! Store the remaining cider in the fridge or serve immediately to family or guests. This cider turned out very well and can be served hot or cold! Add a little caramel sauce for a delicious alternative for those with a sweet tooth.

As an added bonus…if you love how your cider turned out this can make a wonderful hostess gift! Simply pour your delicious cider into a lovely container (simple glass bottles with tops can be purchased at your local craft store and the dollar store), and then present this delicious beverage to the host of the next fall party you attend.

2 Comments

Filed under Budget, Crafts and Gifts, DIY, Education, Family, Food and Drink, Recipes

Boredom Busters: 10 Things to do with Salt and a Cookie Sheet


The kids have started their Autumn trading of the sniffles and with the rain we’ve been getting, we’re inside…  a lot.  Here’s one of my desperate attempts to keep the girls happy and it is working for all ages (2-11).  You’ll probably want to avoid doing the on carpet.  The salt travels around.

20130928-162216.jpg Homemade Zen Garden

20130928-162238.jpgPractice letters, Numbers and Shapes

20130928-162325.jpg Moon themed art

20130928-162342.jpg Self portraits

20130928-162408.jpg  Take your toes to the beach.

20130928-162428.jpg Make Animal tracks… and what ever those circle things are.  lol

20130928-162443.jpg Play I spy

20130928-162503.jpg Make a snow scene

20130928-162519.jpg Make an excavation site

20130928-162553.jpg Create a scene and write a story about it.

Leave a comment

Filed under Children, Crafts and Gifts, Family, Motherhood

Katie’s Baptism Dress

A few years ago I made the baptism dress for my first niece Emma…without realizing it I started a tradition. With 5 (soon to be 6) nieces there will be a few white dresses to make over the coming years. Making the dresses for my nieces is something I am thrilled and honored to do…and I love getting to see the subtle differences in their personalities as they (or my sisters – the girls moms) pick out which dress they want.

WP_20130913_001 WP_20130823_001

Here is the dress Katie chose. She was enchanted by the roses. Although it is a basic pattern I took care to add small details here and there to make it special to her. (As far as sewing goes, this pattern was easy to follow and the difficulty level is low. I recommend gathering the roses for the base of the dress by hand.)

 WP_20130831_003

The dress hanging in the guest room the night before her baptism day. I recommend hanging a handmade dress the night before the event to allow the wrinkles to fall out. (Hanging it in the bathroom during showers to steam out the wrinkles is also a great trick!)

image image

WP_20130901_009

Katie all dressed up after her baptism.

Related articles

1 Comment

Filed under Children, Crafts and Gifts, DIY, Family

Harry Potter Knits – DIY Weasley Sweater

Harry Potter Knits -Weasley Sweater

WP_20130825_006

It turns out, after all these years I still love children’s literature. Despite “growing up,” and transitioning into “adulthood” there is still something alluring and wonderful about children’s literature. I love the basic good vs evil, the wonderfully colorful descriptions of fantastical worlds and of course the fact that in the end good triumphs! So, naturally when the Harry Potter series hit the shelves I was almost instantly hooked. In addition to loving the characters and stories I love all the little details J.K. Rowling adds in that make the worlds and characters come to life. One of my favorite characters is Mrs. Weasley. I love her unfailing love for her family (those biological as well as those adopted in) and of course her wonderful knits! After reading the books and watching the films I knew I needed to attempt a few of these fantastic crafts myself. The number one item on my list to make…a Weasley sweater. Shortly before my eldest sister had her first baby I learned to knit. I was so excited that I wanted to make everything…but unfortunately I wasn’t exactly a master after only a week. However, with a little practice and a lot of fun I did finally manage to make a weasley sweater for my niece! I mapped out the design for her initial (the A) on the front and then set to figuring out how I could do an entire sweater using magic loop. Truthfully, I didn’t follow a pattern I simply applied basic principles of knitting 101…but I think it nonetheless came out great! The only problem is…now I want to make more. So it seems I may need to figure out a pattern…because I am very happy with my Weasley sweater!

image

(AB modeling her new sweater on our recent visit. It fits!)

I look forward to making more crafts and costumes from my favorite books! I hope this has inspired you to dust off the craft box and get to work on your own little piece of fun!

If you like Harry Potter knits like I do here are a few patterns I found on Ravelry.com! I haven’t had a chance to try them yet…but I think I just might need to try them soon!

http://www.ravelry.com/patterns/library/gryffindor-crest-block-hhh-cal

http://www.ravelry.com/patterns/library/harry-potter-sweater

http://www.ravelry.com/patterns/library/harry-potter-illusion-house-scarf

Leave a comment

Filed under Budget, Children, Crafts and Gifts, DIY, Family, Fiction

DIY : Baby Superhero Cape

How To: Make a Superhero Cape for a Onesie

I love sewing and working on special little projects for friends and family; so when I received a baby shower invitation from a friend I pulled out the sewing machines! My friends John and Jane (we shall call them for this post) are big comicon fans and love all of the new superhero movies so much that I knew almost immediately what I wanted to make for them….baby superhero onesies! Then as luck would have it, while I was looking for plain blue and red onesies, I found actual superhero embossed onsies and so all that was needed was the cape. Below are instructions on my latest baby shower gift. I am very pleased with how they turned out!

Step 1: Find onesie and fabric for cape (I couldn’t find the right shade of red in the fabric department so I decided to check out the T-shirts in the little kids section…vowalla cape material!) Create cape pattern (I like to cut my patterns out of old newspapers before cutting the actual fabric. This allows me to make adjustments as needed without loosing fabric and money!)

WP_20130817_001

Step 2: Cut out cape pattern. Because I was using a T-shirt I lined up the bottom of the cape with the bottom hem of the shirt. The ending result is one less hem to sew and a nice clean finished look to the bottom of my cape!

WP_20130817_002

Step 3: Break out your handy dandy sewing machines! (If you don’t sew or don’t have sewing machines you could do this project “no sew” by using fabric glue for the seams and self adhesive Velcro to attach the cape to the neckline of the onesie)

WP_20130817_003

Step 4: Create a zig-zag stitch on the three unfinished (rough) sides to prevent fraying or curling of the T-shirt material. I used my Surger machine (I love this thing!!!)

WP_20130817_004

Step 5: Roll your hems and pin in place. Sew a straight line hem on each side and across the top creating a finished look.

WP_20130817_006

Step 6: With all three sides now hemmed attach your cape to the neckline of your onesie. I attached just below the original hem because I liked how the blue over the top of the red looked. You can also attach right to the top of the onesie if you prefer. Use a straight stitch to attach. (Or if you want the cape to be removable use Velcro or snaps to attach the cape to the shoulders.)

WP_20130817_007

Step 7: Step back and admire your crazy adorable baby superhero outfit! Then wrap it up and happily gift this really fun item! Or if you are making them for your own little superheroes enjoy watching them zoom around the room in their new capes!

WP_20130817_008

Leave a comment

Filed under Budget, Children, Crafts and Gifts, DIY, Education, Family, Motherhood